I was very fortunate to be invited to speak at Unreal Fest 2023 in New Orleans, where I presented a talk titled ‘Making Sense of Collision Data: Practical Tips for Managing Collision Settings & Queries‘.
Collision settings and queries have often proved to be a source of confusion in my time with Unreal Engine, so I was keen to provide a good overview of collision to newer engine users, and also share some lessons and best practices that could be helpful to larger teams.
Recording of the talk.
After the conference, we were able to publicly release one of tools shared in the talk, a ‘collision query test actor’ that lets you configure and see the result of an individual collision query live in editor. You can find it here: https://github.com/StudioGobo/UECollisionQueryTools
My experience as a speaker at the conference was excellent. In addition to putting me up in a hotel for the week, Epic provided everything I needed to feel confident and well-prepared ahead of presenting the talk.
Presenting the talk.
Shortly before the opening session, kicked off by Tim Sweeney.
Outside the Ernest N. Morial Convention Center where the conference was held.
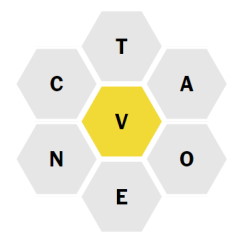
The New York Times Spelling Bee is a word puzzle where you try to make words using the letters provided.
You are given 7 letters with one denoted the ‘center’ letter. Your words can only use the provided letters – though letters can be used more than once – and must include the center letter. Words must be at least 4 letters long.
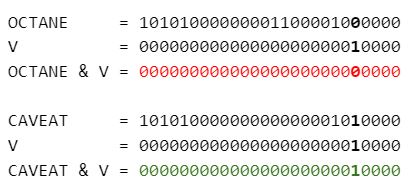
For example, for the above puzzle OCTAVE is a valid word. COVER is not since R is not a valid letter. Neither is OCTANE since it doesn’t use the letter V.
Frustratingly, the New York Times only lets you see which answers you missed on the next day after the puzzle is released! This motivated me to write my own solver, and in the process find an interesting way to test words against the puzzle’s rules.
We’ll walk through the steps to write a C++ program which, given a puzzle as input, outputs all the valid words you can make.
1 – Reading the puzzle
We’ll start by providing a way to input the source letters to the program. We’ll do this as a single line of input, using upper case letters. We’ll assume a convention where the first letter in the input is the center letter.
For example, for the above puzzle, the input would be ‘VCTAOEN’.
The first step to solving a word puzzle like this is realizing there’s no way to generate words from the English language. Instead we’ll need to find an existing dictionary of words we can use, and check if each one is a valid solution. You’ll find there are many word lists freely available online.
Note that no word list is perfect, since there’s simply no authoritative definition of what an English word is. And in the case of the Spelling Bee, official answers are chosen by an editor.
Once we have a suitable word list, we need to load the words for use in our program. We’ll filter out any words shorter than 4 letters at this point.
We have our source letters and a list of dictionary words, now we need a way to check if a given dictionary word is a valid solution. Let’s write a function for this.
We need to check two things: that each letter in our word is one of the source letters, and that the center letter (the first source letter) is contained in our word.
boolis_valid_word(const std::string&word,const std::string&source_letters){ // check if each letter in the test word is one of the source lettersfor(int word_idx =0; word_idx <word.length(); word_idx++){bool is_source_letter =false;for(int source_idx =0; source_idx <source_letters.length(); source_idx++){if(word[word_idx]==source_letters[source_idx]){ is_source_letter =true;break;}}if(!is_source_letter){returnfalse;}} // check that the center letter is contained in our test wordfor(int word_idx =0; word_idx <word.length(); word_idx++){if(word[word_idx]==source_letters[0]){returntrue;}}returnfalse;}
4 – Generating solutions
Now all that’s left is to call this function for every word in our dictionary and output the valid results.
We did miss a few words (AVOCET, CAVA, EAVE, NOVA, NOVAE) and include one word that wasn’t in the official answer list (OCTAVO).
6 – More efficient word checking
It’s my job as a game programmer to write code which doesn’t just do the job, but does it in a performant way. ‘Hot code’ – ie. the code which runs most frequently in the program – is usually the best place to start when optimizing. In our case that’s the is_valid_word function we wrote.
Let’s start with a couple observations about the way we’re checking validity:
1. We’re checking every letter of the test word against the source letters, even though some letters may be duplicated.
2. We are iterating over all the source letters to check for each letter in the word. And we’re iterating over all the letters in the word to check for the center letter.
To improve on both these points, we’re going to change the way we represent words. Rather than an ordered series of characters, we can think of words as just the set of letters they contain. And rather than actually storing each of these letters, we just need to store a true or false value for each of the 26 letters in the alphabet.
CAVEAT = { A = true, B = false, C = true, D = false, E = true... }
This naturally lends itself to a binary representation, where each bit is 1 or 0 indicating if the letter at that position in the alphabet is present in the word.
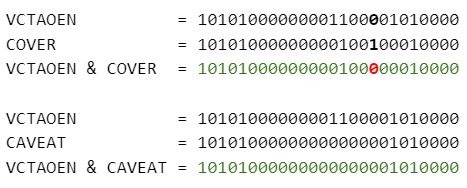
CAVEAT = 10101000000000000001010000
This new representation uses 26 bits of information to store a word. We’ve essentially compressed our data, stripping out any redundant information (letter counts, letter positions) which are not needed for this puzzle.
Once we put our test word, source letters, and center letter into this ‘packed’ representation, we can see how much simpler the problem of checking validity becomes.
To check if the test word contains the center letter, we now just need to check that the test word contains a 1 at the same bit as the center letter, which can be achieved with a bitwise AND between the two binary representations.
And to check if all the letters in the test word are included in the source letters, we want to check that all the bits with a 1 in the test word also have a 1 in the source letters. This can be achieved by performing a bitwise AND between the two binary representations, and then checking that the result is equivalent to the test word. (Note how this corresponds to a necessary and sufficient property of a subset relationship in set theory.)
Now to implement this in our program. First we’ll write functions for creating this ‘packed’ representation from a word or letter.
To evaluate performance I ran each version of the solver 10 times for 10 different puzzle inputs and noted the average time.
Original
406 µs
Packed (excluding dictionary packing)
95 µs
Packed (including dictionary packing)
651 µs
Using the ‘packed’ approach, we’ve achieved a 4x speedup for word checking. This excludes the cost of initially packing the words in the dictionary, but if we include the packing cost our new solution is actually slower! That means for a program intended to only run once this new approach is a poor choice. But because packing the dictionary is a pre-computation step, independent of our puzzle input, we could trivially store the packed representation of each word as part of our dictionary. This more efficient checking would also provide an advantage if we were solving a different puzzle that required testing each word multiple times.
7 – Conclusion
The Spelling Bee is a good introduction to programmatic word puzzle-solving and provides a look at how word puzzles relate to set theory and efficient ways to represent this data.
Full source code for the solver is available here.
In this post I want to share some examples of inefficient usage of TWeakObjectPtr that I’ve come across in my time developing in Unreal Engine, and how these can be improved on.
These tips are pretty straightforward if you’re familiar with TWeakObjectPtr, but they’re useful to keep at the back of your mind any time you’re profiling or optimizing code that makes use of TWeakObjectPtr.
Why use TWeakObjectPtr
TWeakObjectPtr acts as a wrapper to a UObject. It provides a safe way to conditionally access an object that might have been destroyed. Unlike a UPROPERTY reference, it doesn’t prevent garbage collection.
I find it useful largely because it makes the non-owning relationship to the underlying object obvious, and provides clear semantics for getting at the object, which I’ve sometimes seen confusion about when referencing actors or components (will entries in this array get garbage collected? is a null check sufficient or do I need an IsValid check? etc).
It also provides a robust way to check for validity of an object which may have been destroyed, which is not safe using a raw pointer even with an IsValid check – the pointer may now be pointing at a different, yet valid, object! This may seem obvious when talking about cached pointers as class members, but can come up in unexpected places like lambda captures.
And of course a TWeakObjectPtr can be used anywhere, whereas UPROPERTY can only be used inside a USTRUCT or UCLASS.
Generally speaking I’ve noticed that systems often tend towards adopting TWeakObjectPtr over time as rare crashes crop up, and so I find I often just write code using TWeakObjectPtr to begin with.
Dereferencing a TWeakObjectPtr
We can dereference a TWeakObjectPtr using .Get(), which returns either a valid object or nullptr.
To understand how this works you have to remember that a TWeakObjectPtr simply stores the ObjectIndex and SerialNumber of the UObject it’s constructed from. The ObjectIndex is just an array index into the global GUObjectArray, the container of all UObjects, while the SerialNumber is a unique number assigned to each UObject. To get at the object, we look up the object in the GUObjectArray for our stored ObjectIndex (which can fail if our object was destroyed and the index is no longer valid), and then check that the SerialNumber of this object matches our stored SerialNumber (which can fail if our object was destroyed and a different object now exists in this slot).
There’s obviously a performance cost to this, not just the logic that needs to check the object is valid, but the lookup in the GUObjectArray itself. We need to index into an arbitrary chunk of memory, which is likely going to be a cache miss.
Something to note is that .IsValid() has almost exactly the same implementation as .Get(), just returning true or false instead of the object or nullptr.
Tip 1: only check validity once
I sometimes come across code which seems to forget that TWeakObjectPtr checks validity when you use .Get(). The below example checks validity 3 times, which is wasteful:
if (ObjectWeakPtr.IsValid()){ UObject* Object = ObjectWeakPtr.Get();if (IsValid(Object)) { ...
We can do this more efficiently and just as safely:
if (UObject* Object = ObjectWeakPtr.Get()){ ...
As a rule, you shouldn’t be using .IsValid() if you’re going to use .Get(). And remember that a simple null check of the pointer returned by .Get() is enough to know you have a valid object.
Tip 2: only dereference once
Similarly, I sometimes see code which ends up dereferencing the same TWeakObjectPtr multiple times in a row. This usually happens when the code is using operator-> as a syntactical shortcut.
The following code effectively dereferences ObjectWeakPtr 3 times.
if (ObjectWeakPtr.IsValid()){ObjectWeakPtr->Foo();ObjectWeakPtr->Bar();}
We can improve on this with the same pattern as the previous tip: using .Get() once upfront.
if (UObject* Object = ObjectWeakPtr.Get()){Object->Foo();Object->Bar();}
Generally I’d suggest avoiding using operator-> when working with TWeakObjectPtr, since I feel it obscures the underlying dereference that’s taking place.
Tip 3: avoid constructing a TWeakObjectPtr multiple times
TWeakObjectPtr can be implicitly constructed from an object in a few ways. Whilst this is usually a convenience, it’s not always transparent that this is what’s happening when reading through code, and so it can be easy to accidentally end up in a situation where you are repeatedly constructing a TWeakObjectPtr from the same object eg. in a loop body. There’s a cost to constructing TWeakObjectPtr, so we’ll want to avoid doing so unnecessarily.
In the example below, the implementation of operator== constructs a TWeakObjectPtr from OtherObject in each iteration.
Whilst this might be desirable semantics in some cases, it comes at a clear performance cost, since every comparison between two TWeakObjectPtrs that reference different objects must also check .IsValid().
This cost adds up if you’re eg. searching an array of TWeakObjectPtrs for some object. Additionally, in my experience, when you’re doing a lookup like this you usually already know that your object is valid! This makes every one of the .IsValid() checks in operator== unnecessary. For example:
TWeakObjectPtr<UObject> OtherObjectWeakPtr = ... // known to be validfor (TWeakObjectPtr<UObject>& ObjectWeakPtr : ObjectWeakPtrArray){if (ObjectWeakPtr == OtherObjectWeakPtr) { ...
Fortunately TWeakObjectPtr has a function .HasSameIndexAndSerialNumber() which lets us compare the ObjectIndex and SerialNumber of two TWeakObjectPtrs without the .IsValid() check. We can use this to write the previous example more efficiently:
TWeakObjectPtr<UObject> OtherObjectWeakPtr = ... // known to be validfor (TWeakObjectPtr<UObject>& ObjectWeakPtr : ObjectWeakPtrArray){if (ObjectWeakPtr.HasSameIndexAndSerialNumber(OtherObjectWeakPtr)) { ...
While the example above is quite explicit, there are more subtle cases where operator== is being used like TArray.Find() or .AddUnique().
This tip might be more situational in terms of where it can be useful, however I’ve used this approach in the past to significantly improve the performance of some hot loop code.